Let's Get Stitching
1. Pick Your Pattern
Find the project you want to start with (and save all the ones you want to try next to your wishlist).
2. Order Your Kit
To join Stitch Club select your yarn colors and get excited for your goodies to arrive!
3. Get Stitching
Your kit unlocks an exclusive email to access Stitch Club. Where we’ll walk you through every step!
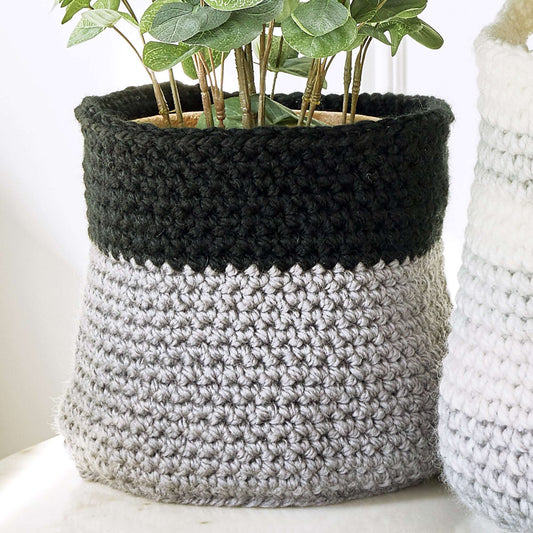
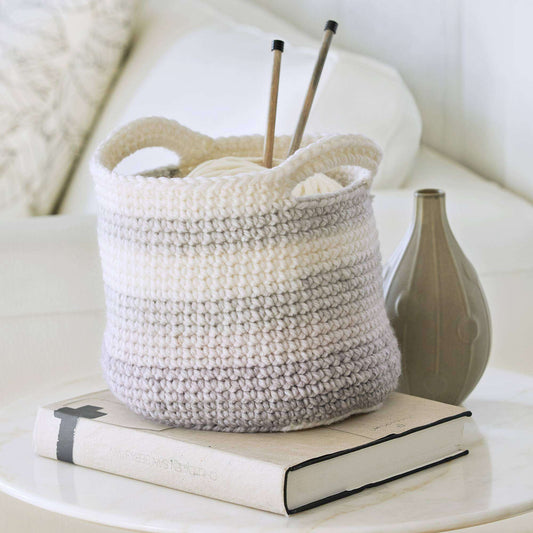
The Bulky Pop Crochet Basket will stitch up in no time with Bernat Pop! Bulky yarn. This super bulky weight yarn is self striping which takes the guess work out of your stitching. Work it up as shown or choose your favorite shade.
Now get your pattern to have at the ready while we walk you through step-by-step!
Pattern Tutorial
Follow along to learn how to crochet your own basket.
What You'll Need
- 2 balls of Bernat® Pop! Bulky in Shades of Gray
- Size U.S. L/11 (8 mm) crochet hook
- Plus, additional craft supplies noted in the video below
If you haven't got your materials yet, you can grab them here.
Tip
Mark the first stitch of each row with a stitch marker to keep track of your rounds.
Stitches & Handy Tips
Need a little extra help? The diagrams and videos below help break down each individual technique, so you can master your new-found crochet skills.
Slip Knot Crochet
-
Step 1
Make a circle with yarn or thread.

Step 2
Pull a loop through the circle.

Step 3
Insert the hook in the loop.

Step 4
Pull gently and evenly to tighten the loop and slide the knot up to the hook. You want the loop to be able to move easily on the hook but be snug around it. Take care that the loop stays on the wider part of the hook and is not on the thumb rest or the narrow part near the head.

Single Crochet
-
Single crochet is the most common basic crochet stitch that will result in fabric. It is abbreviated sc.
Step 1
Insert the hook into the work (second chain from hook on the foundation chain,*yarn over and draw yarn through the work only.

Step 2
Yarn over again and pull the yarn through both loops on the hook.

Step 3
One single crochet made. Insert hook into next stitch; repeat from * in step 1.

Half Double Crochet
-
Half double crochet is in between the height of single crochet and double crochet, and it is made using aspects of both. It is abbreviated hdc.
Step 1
Yarn over and insert the hook into the work (third chain from hook on the starting chain).

Step 2
* Yarn over and draw through pulling up a loop.

Step 3
Yarn over again and pull yarn through all three loops on the hook.

Step 4
One half-double crochet made. Yarn over, insert hook into next stitch; repeat from * in step 2.

Crochet In The Round
Most motifs are not worked in rows but are worked in rounds from the center out. Unless otherwise stated in the pattern instructions, do not turn the work between rounds but continue with the same side facing and treat this as the right side of the fabric.The center ring is usually formed by several chains joined together with a slip stitch to form a ring.
Step 1
Insert the hook into the first chain made.

Step 2
Make a slip stitch to join the chains into a ring.

Step 3
At the beginning of each round, one or more chain(s) can be worked to match the height of the following stitches—this is equal to a turning chain. When working in double crochet, three starting chains are required.

Step 4
The stitches of the first round are worked by inserting the hook into the empty circle space at the center of the ring. Sometimes the first round is worked into the first chain—the pattern will specify how to form the first round.

Step 5
When each round is complete, insert the hook into the top of the chain or stitch at the beginning ofthe round and make a slip stitch to close the round.

Step 6
When working the second and subsequent rounds, unless otherwise stated, insert the hook under the two top loops of the stitches in the previous round.

After joining the final round with a slip stitch, fasten off by cutting the yarn and drawing the end through. Pull gently to tighten and form a knot.
Fasten Off
-
To fasten off the yarn permanently, cut the yarn leaving an 8" end (longer if you need to sew pieces together). Pull the end of the yarn through the loop on the hook and pull gently to tighten.

Weave Ends Crochet
-
Weave in ends securely before blocking pieces or sewing seams. Securely woven ends will not come loose with wear or washing. It's best to work in ends as invisibly as possible.
There are multiple options for yarn needles to use to weave in your ends: straight steel, straight plastic, and bent-tip steel. Use whichever one you prefer.
A good method of weaving in ends is to run the end under several stitches, then reverse the direction and weave it back under several more stitches. Trim the end close to the work. Changing the directions keeps the yarn more secure. Leave at least 4" on the end to weave in securely. If you only weave the end under a couple of stitches it will not be secure. If your yarn is quite thick, you may want to leave extra length.
Depending on the pattern, you may be able to start the process of weaving in your ends by laying the end along your fabric and working stitches around it as you go. This method is not a substitute for traditional weaving-in ends, as you will still need to reverse the direction, but it may begin the process. This method may not work as well when you are changing colors, as depending on the stitch pattern the tail of the old color may show through the stitches of the new color.
If you are working with multiple colors, for example in a striped pattern, keep the ends in the same color as you weave them in. Keeping them in their own color makes them more difficult to see.
If you are not sure if the end will be visible on your fabric when you weave it in, use a yarn needle that is a different color from your fabric. Thread the yarn needle through the stitches, but then check the opposite side before you pull the yarn through. If the yarn needle is extremely exposed, your tail will be as well.
If your tail is too short to weave in with a regular needle or too thick to fit into the eye, use a Susan Bates Finishing Needle. Finishing Needles have the eye all the way along the length of the needle, so it's easier to weave in short or extra-thick tails.