Welcome to the first of in a series of 4 learn-to-sew projects by Elizabeth Hill.
Tweens love to sew with scraps. This Sew Easy Strip Pieced Mini Shoulder Bag builds
on the idea of sewing small scraps together using the presser foot as the seam guide. It is
a perfect project for developing good straight seams and accuracy. Once they
master the steps they won’t be satisfied with just one bag!
Skills: Straight sewing and Zig Zag stitches
Materials
1 ½ yards extra wide double fold bias tape
Variety of 2 ½” wide strips brightly printed fabrics (at least 5)
1/8yard of solid fabric for lining.
Instructions
1. Gather all supplies before you start. Mix and max your fabricfor a
pleasing design.
2. Cut 2 ½” strips into 7” long pieces. Arrange on table in the
desiredorder. I used two each of 4 different fabrics and 1 reallybright fabric
to act as the base for a total of 9 strips.
3. After you have decided on your fabric strip arrangement begin to sew the
strips together with a ¼” seam allowance. Placeright sides together and stitch
along the 7” edge. The arrow points to the inside edge of the presser foot. That is the seam
guide for this project. 
TIP If you have a mechanical sewing
machine a magnet may beused as a seam guide. Don’t use it on a computer machine!
TIP Also a sturdy piece of cardboard may
be taped to the machine to use as a guide.
4. Continue sewing strips long edges matching until all pieces have been
sewn together.
5. The next step is pressing. Pressing from the wrong side of the
fabric press seam allowances toward the outside edges on both sides.
6. This step is optional but gives a nice finished look to the bag.For
students it will underscore the importance of being accurate. On the right side of the
fabric topstitch 1/8” from the seam edge inside the pressed seam allowance. On mymachine
that was just inside the presser foot. See below.
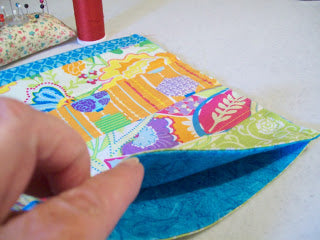
7. Cut lining from the coordinating bright solid fabric by pinning
right side down the fabric strips to the right side of the fabriclining. Pin
and cut out.
TIP Don’t let students pick up the pinned
fabrics for cutting. Pinningand cutting should be done while standing and with the
fabricsflat on the work surface. They may complain about being tiredand want to sit down, or
that it’s too hard. But the cutting lines won’t be as straight and accurate if they pick up
the pinned fabrics. Demonstrate how to cut fabric with the free handgently
holding down the fabric while using the scissors. The fabric isn’t glued to the
table so it can be moved by gently sliding around without picking it up!
TIP If a student has sewn accurate seams
then you can rotary cut alining piece that is 7” x 17 ½”.
8. Right sides together pin the solid fabric to the striped piece of
fabric. Trim if necessary so that they are the same length. Pin the top
and bottom edges. Again using a ¼” seam allowance sew the lining to the outside
fabric along the narrow edges.
9. Turn right side out and press the edges. Top stitch along thesewn
edges if desired.
10. Pin the mini should bag together by matching both ends.
Baste sides together with a scant ¼” seam.
TIP What does scant mean? Just
shy of the 1/4” seam guide. Just inside the line so to speak.
11. We are getting down to the last step. Time for the bias tape. To decide
how much tape to use place bias tape over the shoulderwith the same amount hanging from each
side of the shoulder.
Place the bag at the ends and keep raising the bag until you
have the length desired. Be sure to leave at least six inches hanging below each
side. This extra will be tied below the shoulder bag once the bias tape has been sewn in
place. It serves both a decorative and functional purpose.
12. Trim off any excess bias tape but don’t forget about the portions
that will be tied later.
13. Before attaching bias tape to shoulder bag give the tape a
nicepressing without stretching it. Don’t worry about pressing thefolds out of
the bias tape. Just remove any creases or fold marks from where it was wrapped around the
cardboard.
14. Be sure you have extra wide double folded bias tape. Open
the bias tape. You will have three folds. Beginning at the bottom of
the bag pin the bias tape so that the narrow fold line is covering the basted stitch.
Be sure to leave 6 inches of bias tape free for tying later. Adjust the length
of the shoulder strap as needed.Now pin the other side. Again leave six inches of bias tape
free at the bottom of the bag.
Starting at the bottom of the bag stitch the length of the side
of the bag stitching in the first fold line. Remember to backstitchbeginning
and end. Do not worry about sewing the strap at this point. That will be taken
care of later. Repeat on the other side.
15. Now fold the bias tape to the back of the bag and pin in place.You
will have a nice finished edge on both sides of the tote bag. To secure the
tape you are going to sew down the center of the bias tape with a medium width
and medium length Zig zag stitch. Play with some scraps first to find the right
stitch size for your bag.
16. Starting at the bottom of the bag Zig zag stitch down the middle of
the bias tape being sure that you are catching all layers within the bias tape.
Do not stop stitching when you get to thetop of the bag instead keep on sewing over
the handle and on to the other side of the bag. This will give a nice finished edge to the
handle as well as the shoulder bag itself.
17. To finish the bag tie a knot on either side of the bag with the
bias tape that is hanging free at the bottom of each side. Trim if necessary. If you want
add colorful pony bead to the bias tapebefore making the knot.
18. Now your Sew Easy Strip Pieced Mini Shoulder Bag is ready to use!
Just right for summer essentials like mp3 players, e- readers, and your
sunglasses!