


How fun is it to use sewing notions in unexpected places? When we think of piping, we normally think of a small fabric covered cord along the edge of a garment portion or perhaps a slightly larger twisted cord running around the edge of a home décor pillow. In both instances, the exposed portion of the trim is attached to a lip hidden between the adjacent fabric layers, holding the trim in place. In addition to edges, you can also add piping to seamlines for accents.
But, that piping can just as readily be a zipper as a fabric covered cord. Because zippers are made with different types of teeth, the zipper piping can showcase brass teeth, molded plastic teeth, or tiny coil edgings. Coats has many zippers to choose from!
Using zipper as piping means you get twice the usable length per zipper, as you only use half at a time. Be sure that the zipper you select is long enough to fit the piece you want to pipe. If not, you can overlap the ends and discreetly stitch the lengths together to look like continuous teeth. Sleeping bag zippers offer up a 200″ length of bold teeth (using both halves), perfect for piping. Colorful big-teeth sport zippers work well also.
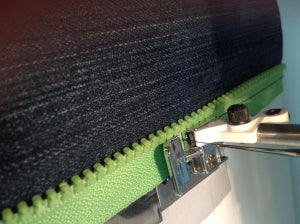
Separate the zipper halves, trim off the stops and remove the slider (save for another project). Place the zipper along the fabric edge with the teeth toward the project and the zipper tape toward the cut edge. To go around corners or curves, clip into the zipper tape and spread or overlap as needed. Pin in place.
 Baste 1/8 inch from zipper teeth
Using your machine’s zipper foot, place the needle on the side closest to the teeth and baste the piping in place about 1/8″ from the teeth edges.
 Stitch closer to teeth to join the second fabric layer
 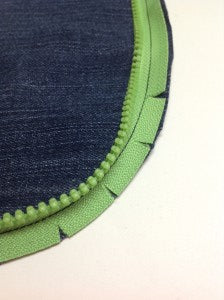 Clip and spread zipper tape around curves
Place the second side of the project right sides together on top of the piped section, matching markings, notches, etc. Using the basting line as a guide, stitch the layers together just inside (toward the teeth) the previous stitching line. If your machine has an adjustable needle position, move it toward the left for the second stitching.
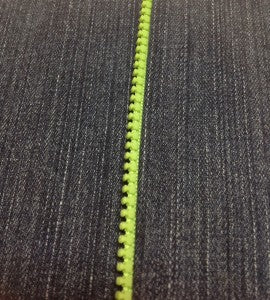 Piping using a Sport-weight zipper
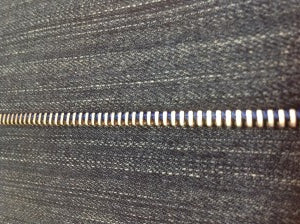 Piping using Fashion Metal Zipper
If you’re using a Coats Fashion Zipper with a printed tape, adjust the stitching location to let some of the tape show on the finished piping as a colorful accent.
 Piping using Fashion Zipper with print tape
Turn the project right side out and voila—perfect zipper piping!
