
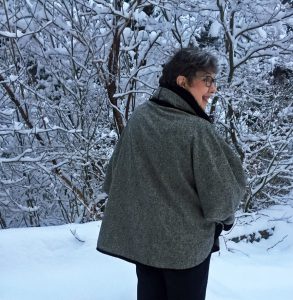
 My hubby and I are privileged to spend Christmas in “Narnia” every year at the mountain camp where our son is the Director. It was the perfect setting for pictures of my finished Indygo Junction Warm & Cozy Wrap. Snow, warm, cozy, wool – it all goes together magnificently!

The Fabrics
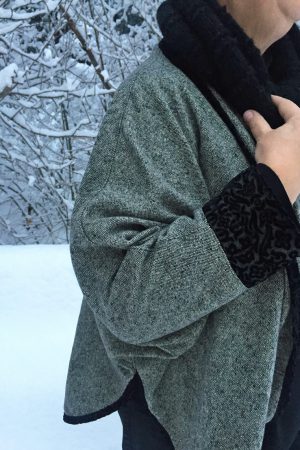
When Indygo Junction introduced the Warm & Cozy Wrap last year, I knew I wanted to make one. For my first version, I chose a soft, black and grey Wool Tweed from my CCFS (Carefully Curated Fabric Stash). The shape of the Warm & Cozy Wrap inspired visions of Victorian “smoking jackets” in my sewing soul. So, I chose a black, Burn-out Velvet for contrasting trim and cuffs.
The Wrap Change-Ups
As usual, I made a few changes. I find it boring to just follow the pattern, so there’s always a little personal twist to anything I sew!
- For this look, I wanted something more than the turned under or serged finish edges recommended in the pattern. So, I used the black Velvet for a bias edge finish.
- Since I’m a couple of inches taller than average, I lengthened the Wrap body about 3” at the hemline and re-drew the curves.

- The side seams were stitched down about 4″ farther than shown in the pattern. I just thought I would like that for this particular version and I do.

- Instead of the 1/4″ pocket topstitching in the pattern instructions, I chose to top stitch at 1″. It’s a more substantial look and I like it on the Wool Tweed.

- For the sleeve cuffs, I cut Wool Tweed for a lining and Velvet for the outer cuff. I love the way the contrast turned out!
The Making of My Wooly Wrap
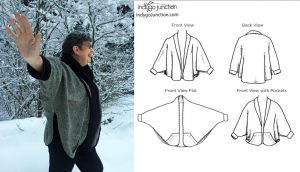
The Warm & Cozy Wrap has just four pattern pieces. It’s super quick and easy to cut out and sew. You’ll cut a back, two fronts (right and left), two cuffs and two pockets. That’s it!

Pockets! There are pockets!! I considered trimming the pockets in Velvet, but decided it would be too matchy-matchy for the look I wanted. So, I followed the pattern and finished the straight pocket edges on the serger as directed. The curved pocket edge is lined up with the front curve of the body and caught in the Wrap edge finish. I chose black Coats Thread for all the serging and top stitching.

The Warm & Cozy Wrap instructions are simple and great – I pretty much just followed what was written. Other than the notes above, I did add in pressing the seams and top stitching the center back collar and shoulder/sleeve seams. I’m an avid fan of top stitching and the finished look it adds, so it shows up often in my Handmade Wardrobe.
The shawl collar and lapel of the Wrap are cut in one piece with the body front. Step 1 is to sew the center back seam of the collar, right sides together. Somehow I managed to sew the seam wrong sides together, so the serged seam shows on the outside of my collar. I’m calling it a design feature for this Wrap, but I’ll sew it RST, next time!

My Burn-Out Velvet was 45″ wide. I cut four 3″ wide bias strips for the trim around the edge of the Wrap. The strips were seamed right sides together, so they were ready to stitch to the edges.

Fold Over Bias is an easy edge finish I use quite often. The strip is sewn to the garment edge RST, then turned to the back, held in place with Wonder Clips or pins and top stitched from the right side. It works beautifully for just about any fabric!
The Wrap & I
The Warm & Cozy Wrap is a cape-like style. I don’t usually love that style on my shape, but this one looks super-great. I will definitely wear it! For the “Narnia” pictures, it’s layered over a long sleeve, black knit turtleneck paired with a fluffy, black, hand-knit cowl. I could also wear it over a bright color and, in warmer weather, replace the cowl with a light scarf. It was fun with my jeans in the snow, but would be terrific worn with leggings, too.
All together, I really enjoyed this make and will definitely stitch the Wrap again in other fabrics. It’s quick, easy, awesomely cozy and totally one of my new faves!
