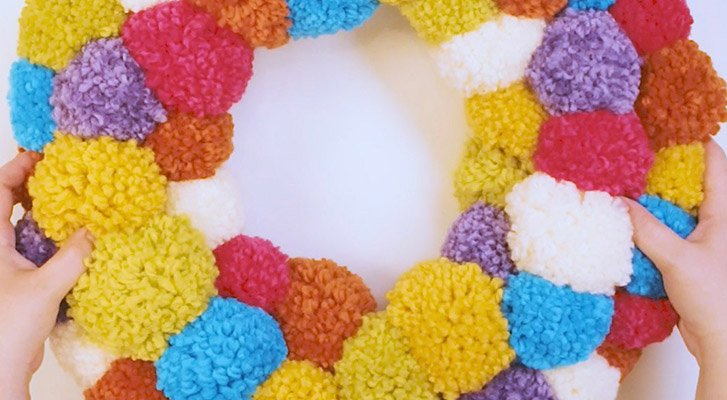
Pompoms are all the rage right now, they’re easy to make and you’d be surprised by the different ways you can make beautiful creations out of pompoms, like this wonderful pompom wall hanging! This blog post we’ll show you step by step how to create this simple DIY pompom decor project.
Supplies
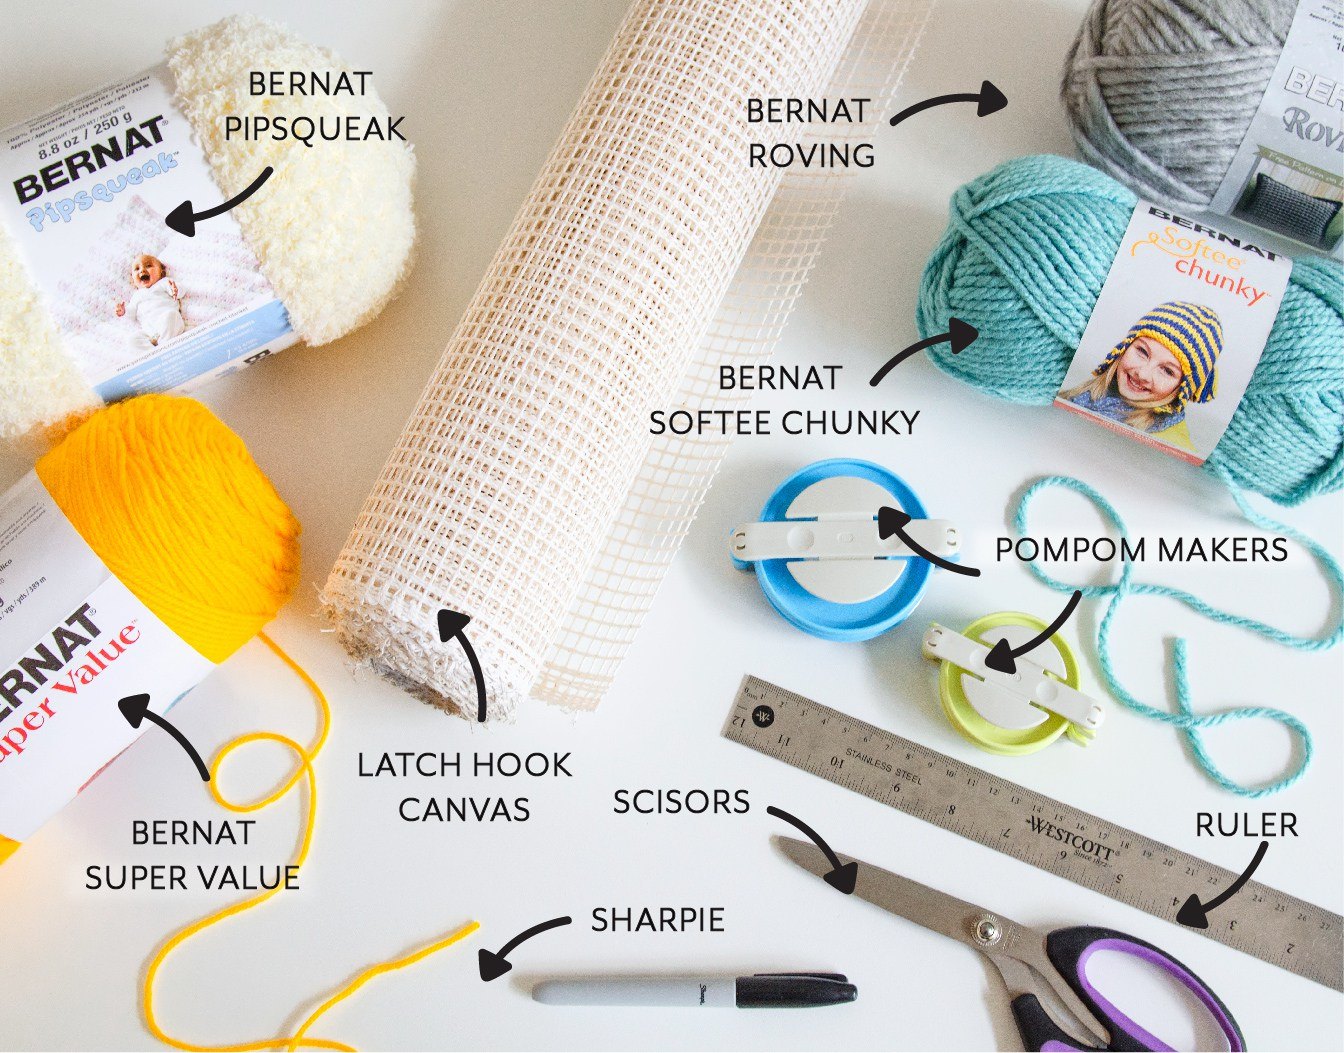
Featured Yarn:
In order to make this Pompom Wall Hanging you’ll need a latch hook canvas to tie the pompoms onto securely.
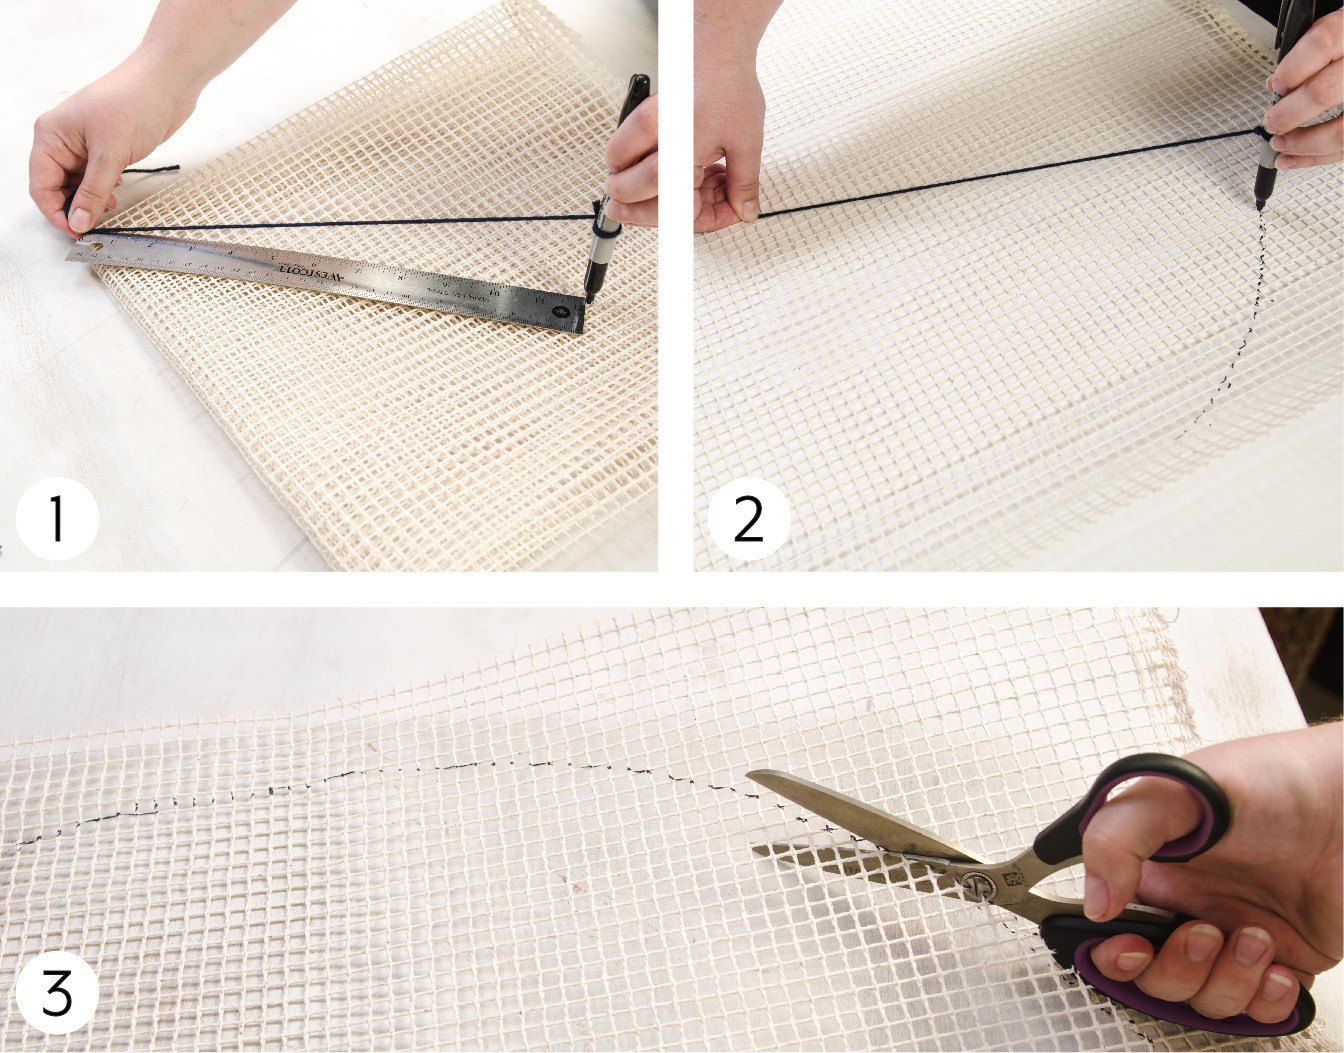
Step 1: Fold your latch hook canvas into a square. Then using a ruler and a sharpie with a piece of yarn that is the same length as your ruler, measure from one point of the folded square to your desired length. Use your sharpie and hold the yarn to the original point you measured out from. Use your hand with the sharpie in it to mark the first part of your circle.
Step 2: Make sure to mark the point from where you originally measured, then open up your latch hook canvas and place your piece of yarn to the center point. Using your sharpie draw the rest of your circle and make sure you line up to your original marking.
Step 3: Cut along the black line!
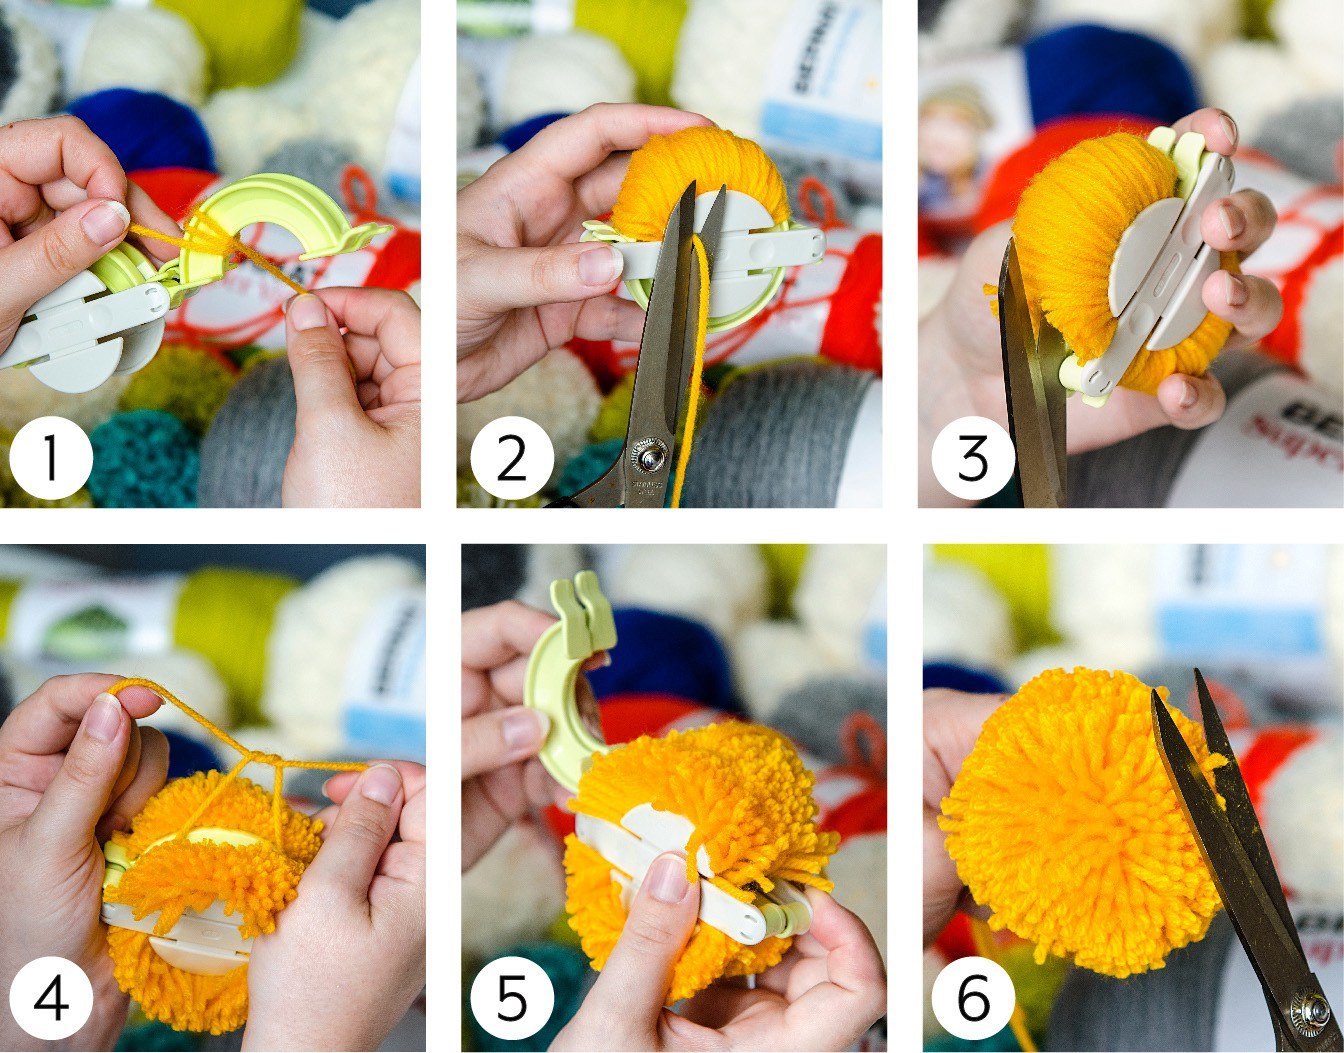
Making a pompom with a pompom maker can sometimes be tricky but with the right yarn it’s well worth it when your pompom comes out looking perfect!
Using the image above we’ll show you how to make a pompom using the Red Heart Pom & Tassel Maker, Teal.
Step 1: Pull out the handles on one side of the pompom maker and wind your yarn around the pompom maker handle. Make sure you use a good amount of yarn as this will ensure you make plush and fluffy pompoms.
Step 2: Once you’ve wound your yarn around the handle, cut the ball end of the yarn. Repeat steps 1 to 2 on the pompom maker handle located on the other side.
Step 3: Use the guide located in the middle of the pompom maker handles to cut along the yarn wound around each handle.
Step 4: Cut a string of yarn from your yarn ball and use this guide to tie your pompom tightly.
Step 5: Once your pompom has been tied tightly, you can gently remove the pompom maker handles by moving them up and over your yarn.
Step 6: Now that you have a pompom you can trim and perfect the pompom’s shape to your liking.
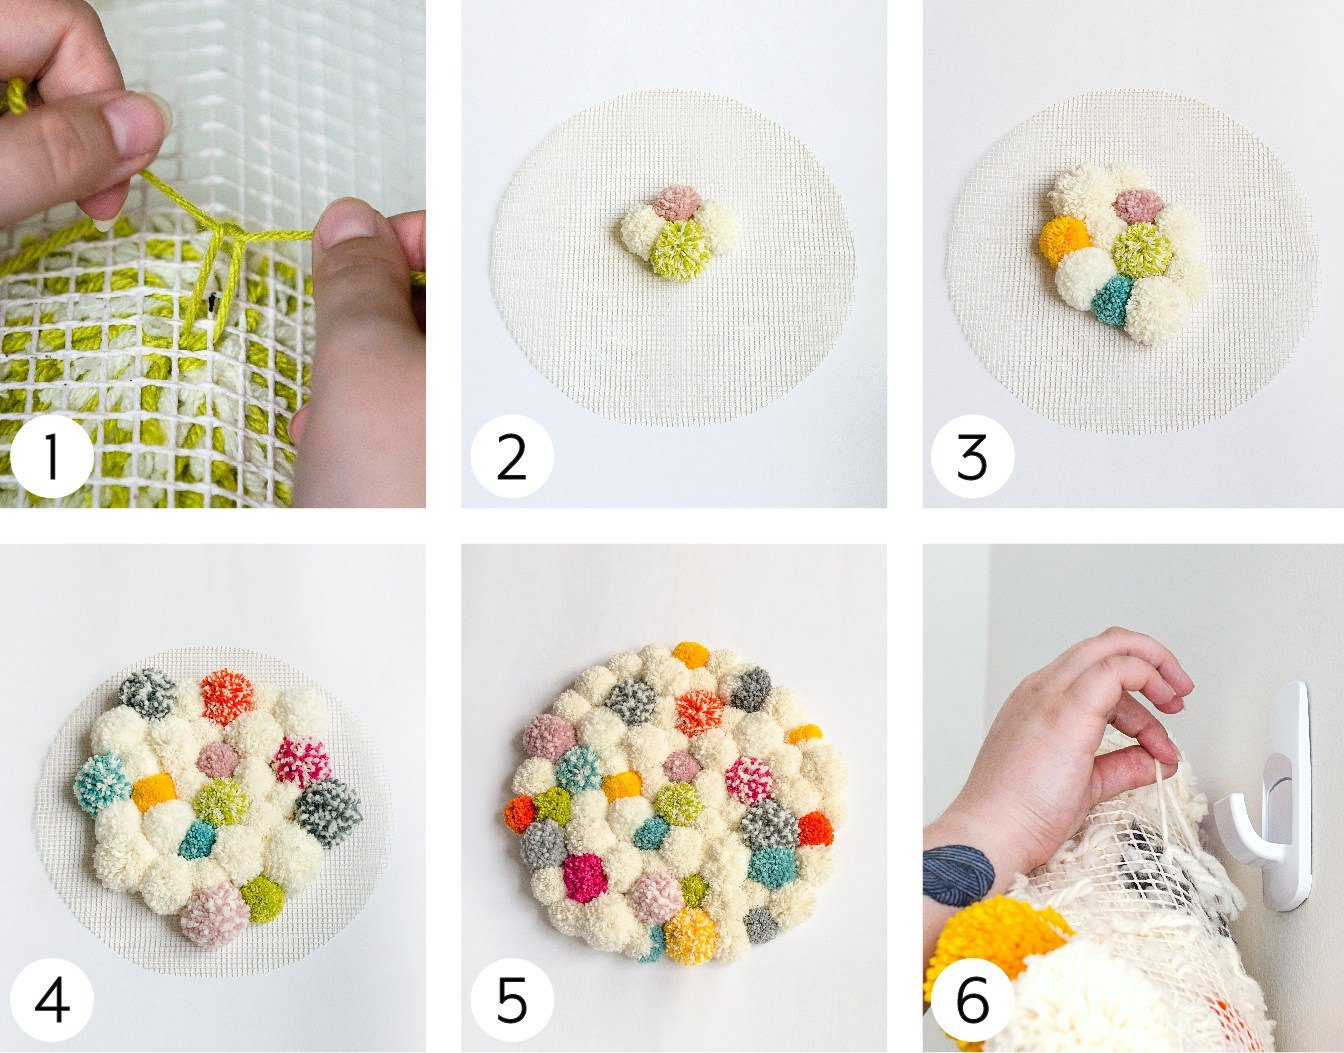
Steps 1 – 3: Use your excess yarn to tie your pompom together and tie your pompom to the latch hook canvas. Make sure you tie these pompoms close to each other on the latch hook canvas. This will create a full and plush pompom wall hanging like in the photos above.
Step 4 – 6: Continue to tie on pompoms and mix & match colors how you’d like. Once your latch hook canvas is fully covered with pompoms you can use a piece of yarn and tie this to the back to make a loop that can be used to mount onto a wall hanging hook.
There you have it, your very own Pompom Wall Hanging! Make sure you share your pompom projects with us on our Facebook page @yarnspirations and on Instagram using #pompomparty. View our new pompom guide for everything you need to start your next pompom project here.
In order to make this Pompom Wall Hanging you’ll need a latch hook canvas to tie the pompoms onto securely.
Step 1: Fold your latch hook canvas into a square. Then using a ruler and a sharpie with a piece of yarn that is the same length as your ruler, measure from one point of the folded square to your desired length. Use your sharpie and hold the yarn to the original point you measured out from. Use your hand with the sharpie in it to mark the first part of your circle.
Step 2: Make sure to mark the point from where you originally measured, then open up your latch hook canvas and place your piece of yarn to the center point. Using your sharpie draw the rest of your circle and make sure you line up to your original marking.
Step 3: Cut along the black line!

Making a pompom with a pompom maker can sometimes be tricky but with the right yarn it’s well worth it when your pompom comes out looking perfect!
Using the image above we’ll show you how to make a pompom using the Red Heart Pom & Tassel Maker, Teal.
Step 1: Pull out the handles on one side of the pompom maker and wind your yarn around the pompom maker handle. Make sure you use a good amount of yarn as this will ensure you make plush and fluffy pompoms.
Step 2: Once you’ve wound your yarn around the handle, cut the ball end of the yarn. Repeat steps 1 to 2 on the pompom maker handle located on the other side.
Step 3: Use the guide located in the middle of the pompom maker handles to cut along the yarn wound around each handle.
Step 4: Cut a string of yarn from your yarn ball and use this guide to tie your pompom tightly.
Step 5: Once your pompom has been tied tightly, you can gently remove the pompom maker handles by moving them up and over your yarn.
Step 6: Now that you have a pompom you can trim and perfect the pompom’s shape to your liking.

Steps 1 – 3: Use your excess yarn to tie your pompom together and tie your pompom to the latch hook canvas. Make sure you tie these pompoms close to each other on the latch hook canvas. This will create a full and plush pompom wall hanging like in the photos above.
Step 4 – 6: Continue to tie on pompoms and mix & match colors how you’d like. Once your latch hook canvas is fully covered with pompoms you can use a piece of yarn and tie this to the back to make a loop that can be used to mount onto a wall hanging hook.

There you have it, your very own Pompom Wall Hanging! Make sure you share your pompom projects with us on our Facebook page @yarnspirations and on Instagram using #pompomparty. View our new pompom guide for everything you need to start your next pompom project here.