Hi, I’m Kristen Mangus, the knitting video host and designer from the GoodKnit Kisses YouTube channel. I love teaching and being the knitting host for Yarnspirations this year. I hope you enjoy my latest blog and tutorial for YOU.
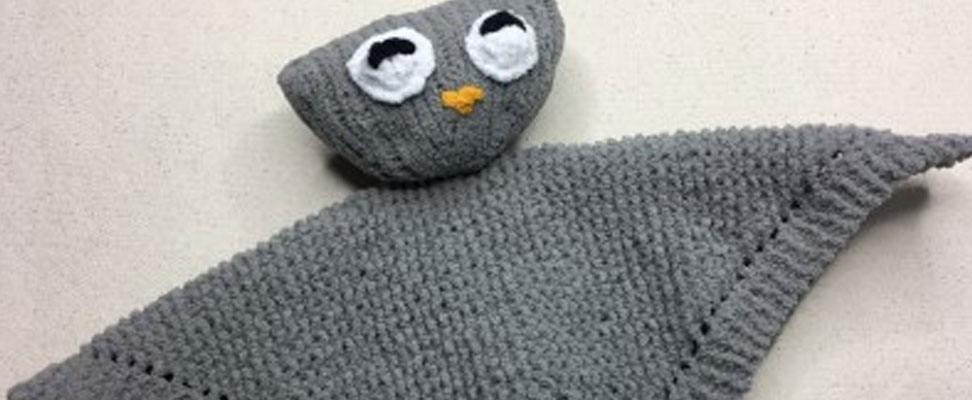
Today we're working on the Knit Lovey!
Knit Lovey
I seriously love the latest Baby Shower Lookbook from Yarnspirations! It’s full of adorable patterns and even more adorable babies. The Owl Hat jumped off the page and I know I had to knit that one. As I kept flipping back and forth between the Owl Hat and the Knit Lovey I couldn’t shake the feeling that these two needed to be a set!
I am excited to show you how take this Knit Lovey Pattern and turn a cat into an owl. The basic shape is already perfect for an owl so I could just follow the pattern. Win, win!
There’s a new kid on the block you’re going to want to meet! Your old favorite Bernat Blanket Yarn has a new little cousin. Bernat Baby Blanket Tiny Yarn is the same soft, squishy yarn you’ve grown to love, but in medium weight. It is the perfect weight for a lovey!
This is an easy pattern, and I want to make sure you can make this project from start to finish. If you have never knit a stitch before I do recommend learning some basics first. I have some beginner videos to teach you the longtail cast on, knit and purl.
So whooo’s with me as we knit this adorable project together?
The Pattern
The Yarn
- Contrast A Bernat Baby Blanket Tiny, Gray Owl (1 ball)
- Contrast B Bernat Baby Blanket Tiny, Sunflower (3 yds.)
- Contrast C Bernat Baby Blanket Tiny, Snow Cap (5 yds.)
- Contrast D Bernat Super Value, Black (3 yds.)
Needles & Supplies
- Set of 4 double pointed needles in size U.S. 3 (4 mm)
- Size U.S. 6 (4 mm) knitting needles
- Stuffing
- Stitch Marker
- Scissors
- Tapestry needle
Skill Level
Easy
Size
Approx 12” [30.5 cm] square
Gauge
18 sts and 24 rows = 4″ [10 cm] in stocking st with larger needles.
Skills demonstrated in tutorial
- Working with double pointed needles (DPNs)
- Long tail cast-on
- Knit stitch
- Purl stitch
- Kfb – knit front and back
- K2tog – knit 2 together
- Ssk – slip, slip knit
- Grafting
- Backstitching
- Weaving in ends
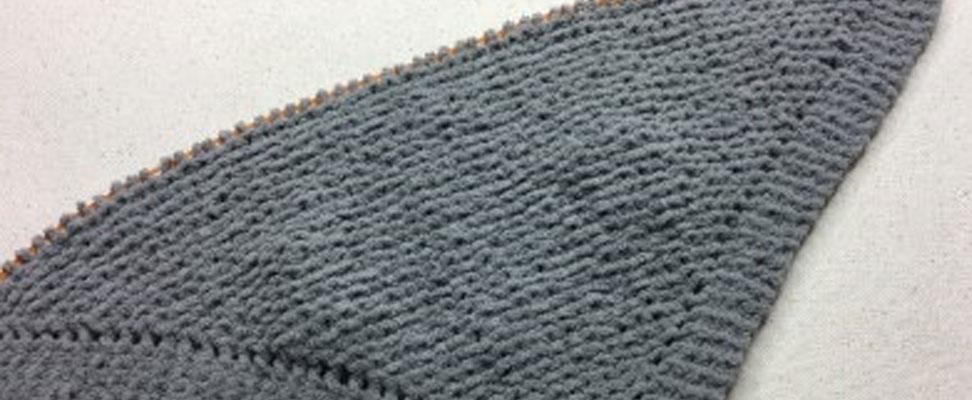
The Body
Let’s get started with the body. We’ll be knitting a simple square on the diagonal or corner to corner. It’s very similar to the Grandma’s dishcloth pattern that you grew up knitting. If you’re new to this style, don’t worry the increases and decreases are simple and I’ll walk you through.
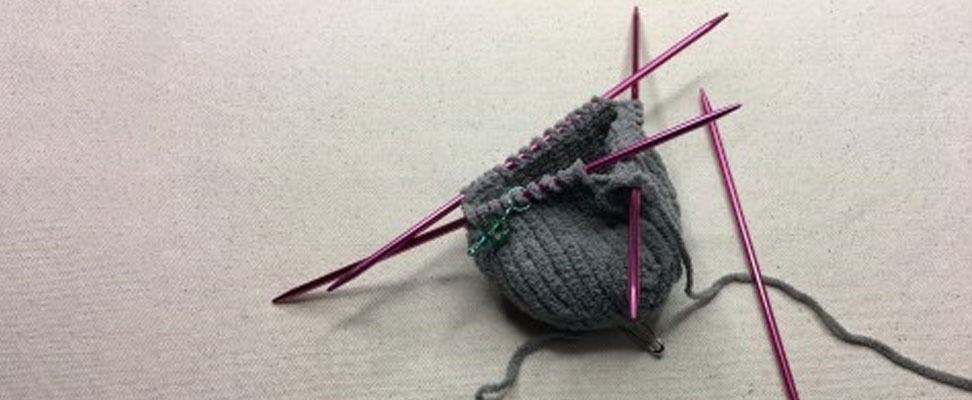
The Head
Now that our lovey has a body let’s get to work on the head. The head is knit from the bottom upward so we only have a few stitches to cast on before we start increasing. The first few rounds you may feel like you are all thumbs working so few stitches on the DPNs because you have to hold them so close together. Just stick with it and it gets much easier after Round 5.
[NOTE: The cast on and increase rounds are shown on Size U.S. 11 (8 mm) needles using Bernat Blanket Yarn. This is done so you can clearly see the stitches and how to work the increases in a small round.]
The increases are worked using a Kfb (knit into the front and back of the stitch) and I show you three different ways to work this increase. I’ll admit it is a little tricky maneuvering the DPNs in such a tight space when getting started, but my tips for working these increases will get you past the tough part.
The ear shaping comes next and a few rounds later you’re ready to add the face.
The Face
The eyes are knit separately and attached.
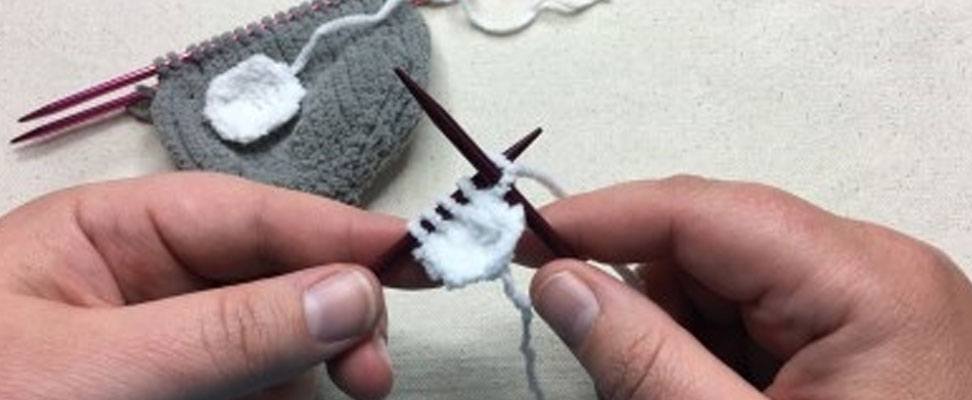
NOTE: The eyes are NOT included in the original pattern, but the instructions are written below:
Owl Eyes [make 2]
With white yarn, cast on 3 sts.
1st row: (RS). Kfb. K1. Kfb. 5 sts.
2nd and alt rows: Purl.
3rd row: K1. Kfb. K1. Kfb. K1. 7 sts.
5th row: K1. ssk. K1. K2tog. K1. 5 sts.
7th row: K1. ssk. K2tog. 3 sts.
Cast off purlwise.
Sew the eyes on to the face going all the way around the edge of each eye. Using the backstitch technique as shown in the pattern embroider the eyelids and beak of the owl. Yay! Our little friend has a face.
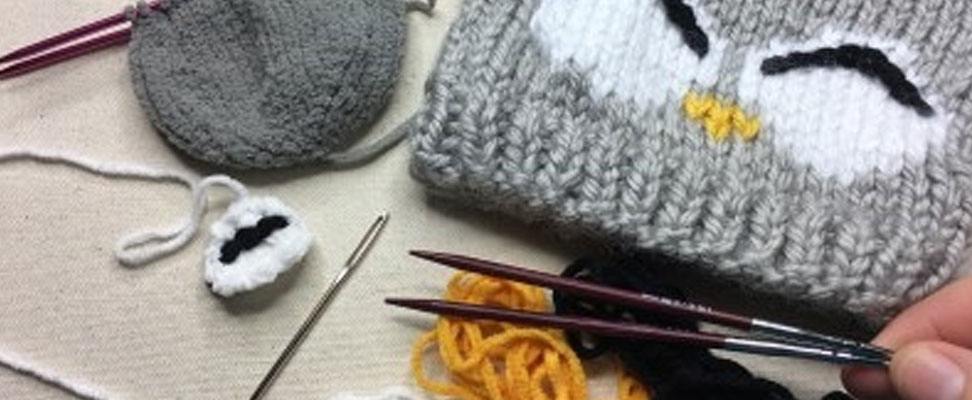
Finishing
Now that our owl has a face, let’s stuff and finish him. Stuff the head while it is still on the needles. The head is closed by grafting so it appears seamless. This is an excellent technique to learn and you’ll find dozens of uses for it.
Sew the head securely to the middle of the body. This lovey is sure to be a cuddly pal for the little one in your life.
Owl Knit Lovey Video tutorial
Happy Knitting!
Kristen Mangus @ GoodKnit Kisses
Are you ready to create this project with me? We’d love to see your photos!
If you post on Facebook, Instagram, Twitter or Pinterest also use the hashtag #Yarnspirations and #GoodKnitKisses as much as you like.
Needles & Supplies
- Set of 4 double pointed needles in size U.S. 3 (4 mm)
- Size U.S. 6 (4 mm) knitting needles
- Stuffing
- Stitch Marker
- Scissors
- Tapestry needle
Skill Level
Easy
Size
Approx 12” [30.5 cm] square
Gauge
18 sts and 24 rows = 4″ [10 cm] in stocking st with larger needles.
Skills demonstrated in tutorial
- Working with double pointed needles (DPNs)
- Long tail cast-on
- Knit stitch
- Purl stitch
- Kfb – knit front and back
- K2tog – knit 2 together
- Ssk – slip, slip knit
- Grafting
- Backstitching
- Weaving in ends
The Body
Let’s get started with the body. We’ll be knitting a simple square on the diagonal or corner to corner. It’s very similar to the Grandma’s dishcloth pattern that you grew up knitting. If you’re new to this style, don’t worry the increases and decreases are simple and I’ll walk you through.

The Head
Now that our lovey has a body let’s get to work on the head. The head is knit from the bottom upward so we only have a few stitches to cast on before we start increasing. The first few rounds you may feel like you are all thumbs working so few stitches on the DPNs because you have to hold them so close together. Just stick with it and it gets much easier after Round 5.
[NOTE: The cast on and increase rounds are shown on Size U.S. 11 (8 mm) needles using Bernat Blanket Yarn. This is done so you can clearly see the stitches and how to work the increases in a small round.]

The increases are worked using a Kfb (knit into the front and back of the stitch) and I show you three different ways to work this increase. I’ll admit it is a little tricky maneuvering the DPNs in such a tight space when getting started, but my tips for working these increases will get you past the tough part.
The ear shaping comes next and a few rounds later you’re ready to add the face.
The Face
The eyes are knit separately and attached.

NOTE: The eyes are NOT included in the original pattern, but the instructions are written below:
Owl Eyes [make 2]
With white yarn, cast on 3 sts.
1st row: (RS). Kfb. K1. Kfb. 5 sts.
2nd and alt rows: Purl.
3rd row: K1. Kfb. K1. Kfb. K1. 7 sts.
5th row: K1. ssk. K1. K2tog. K1. 5 sts.
7th row: K1. ssk. K2tog. 3 sts.
Cast off purlwise.
Sew the eyes on to the face going all the way around the edge of each eye. Using the backstitch technique as shown in the pattern embroider the eyelids and beak of the owl. Yay! Our little friend has a face.

Finishing
Now that our owl has a face, let’s stuff and finish him. Stuff the head while it is still on the needles. The head is closed by grafting so it appears seamless. This is an excellent technique to learn and you’ll find dozens of uses for it.
Sew the head securely to the middle of the body. This lovey is sure to be a cuddly pal for the little one in your life.
Owl Knit Lovey Video tutorial
Happy Knitting!
Kristen Mangus @ GoodKnit Kisses
Are you ready to create this project with me? We’d love to see your photos!
If you post on Facebook, Instagram, Twitter or Pinterest also use the hashtag #Yarnspirations and #GoodKnitKisses as much as you like.