
Around my town, the Farmer’s Markets open in May. I love, love, love buying fresh, seasonal produce, chatting with the farmers and supporting local farming. Often my Saturday morning trip to the Market is combined with other weekend errands and my fresh produce isn’t quite as fresh by the time I get it home. So, I was thrilled to find an awesome Insulated Tote I can make for my precious lettuces, herbs and fruit!
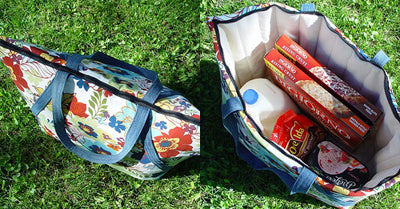
Vanessa from Punkin Patterns shared a great step-by-step tutorial on the Sew Mama Sew blog that is just the perfect thing for Market shopping needs. Her Insulated Tote has a zippered top and features a double layer of Warm Company’s Insul-Bright batting to keep cold things cold and hot things hot. That makes it a fabulous all-season tote! If you can’t find Insul-Bright at your local fabric store, you can check the Warm Company web site to see who carries their products in your area or where you can order it online.
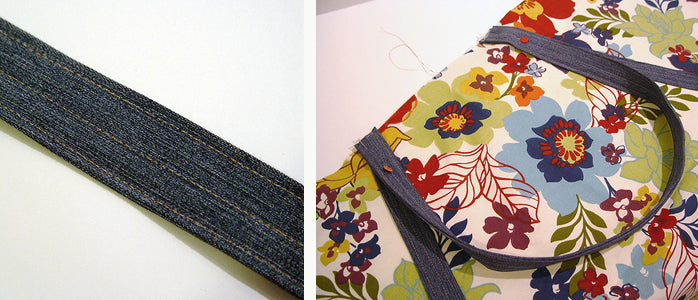
You’ll start by assembling straps made from recycled jeans – I love that, too! Be sure you have a heavy weight needle on hand for your stitching as Vanessa recommends. You know how denim is and once you’ve folded it into straps it’s going to be thick. Look for a 100 to 110 needle.

It looks like Vanessa used regular thread on her straps, but I really love Coats Dual Duty XP Heavy Thread for top stitching, so I’ll probably use that. I love the bold look and the color range is pretty cool! Have fun with your thread choice. Top Stitching is a great opportunity to be playful on a project like this!.For the rest of your sewing, regular Dual Duty XP Plus will be perfect.
A few thoughts:
- Vanessa suggests a canvas weight fabric for the outside of your tote. An excellent idea for strength and durability! Since rain is an all-year possibility in my area, I’m thinking about a Laminated Cotton for my tote.
- The Insul-Bright double layer will be sandwiched between your lining and the outer fabric so that heavy weight needle will still be needed.
- On your own, you could add an insulated pocket to the inside of the tote before the sandwiching begins. That way, you’ll have a pocket for a freezer pack to help keep your produce fresh. You could also slip a freezer pack into the bottom of the tote.

Once you’ve assembled the layers, it’s time for the zipper. Coats All Purpose Zipperscome in tons of colors and lengths and would be perfect. Grab your zipper foot and you’ll be ready to go. The tutorial has great instructions and steps with good pictures to walk you through. If you’re not zip savvy, don’t be intimidated! This is a good time to learn how to stitch in a zipper so you’ll be ready for other projects, too.

Have you done this before? It’s my favorite way to make a square bottom on a tote, bag or purse. It’s simple to do and if you’re new to this kind of corner, I know you’ll find yourself using it on other projects, too. File the instructions for future “gotta have a tote” sewing!

We made it! The last step is a bit of hand stitching to close up the opening that you used to turn your tote right side out and you’re done!! I love it that Vanessa used a plain muslin type lining for the tote. Usually colorful linings are fun, but in this case you’ll be able to see your produce much better against that nice plain color.

Click here for Vanessa’s Insulated Tote Tutorial. . . but, of course, I can’t leave you with just one tote. Coats and Clark has free instructions for a Gourmet Grocery Tote that would be a terrific option for Farmer’s Market shopping, too! The outside pockets will be handy and, if you like, you could add a zipper to the top opening. Click here for the Gourmet Grocery Tote instructions.
I better get to work – I just realized I need two totes! One for the car, one to carry inside. That way I’ll be ready for any Farmer’s Market I happen to come across. Or a yard sale. Or ice cream. Or cold beverages. Yep – I’ll definitely need at least two and I bet you will, too. We better get started!
